> ## Documentation Index
> Fetch the complete documentation index at: https://enterprise-docs.bglobale.com/llms.txt
> Use this file to discover all available pages before exploring further.
# Installation
**This section does not apply to Shopify's Checkout Extensibility. For more information and support, contact your Project Manager.**
The integration of the CrossBorder solution requires that you install, enable, and configure **both**, the CrossBorder App and the Global‑e Payment app for the solution to be functional.
Note that these applications are interdependent and **cannot** be implemented or used separately.
The following figure illustrates the installation of the Global‑e Application for Shopify.
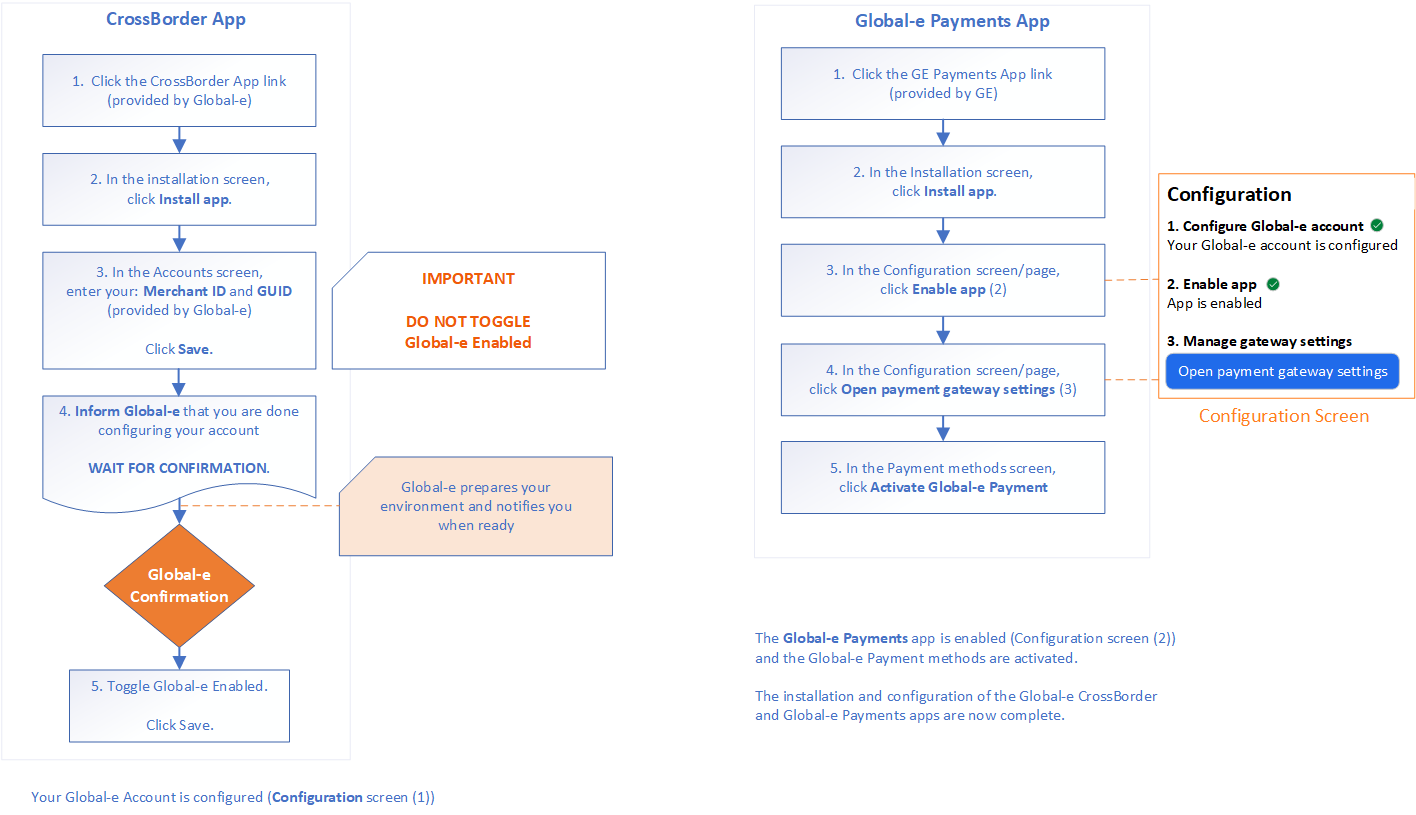 For details, see:
* [Install the CrossBorder App](/installation-271802#install-the-crossborder-app)
* [Install the Global‑e Payments App](/installation-271802#install-the-global-e-payments-app)
## Install the CrossBorder App
The Global‑e CrossBorder app works in tandem with the Global‑e Payments; this app cannot be implemented or used independently.
The following sections describe the steps needed to perform the **initial** installation and configuration of the Global‑e CrossBorder Application.
**To install the Global-e CrossBorder application:**
1. Click the Global‑e CrossBorder installation link.
**STG (Staging)** - Sandbox Example:
[https://apps.shopify.com/global-e-crossborder-int](https://apps.shopify.com/global-e-crossborder-int)
**PROD (Production)** - (Example):
Run the installation on the subdomain Myshopify.com.
[https://apps.shopify.com/global-e-crossborder](https://apps.shopify.com/global-e-crossborder)
The installation screen opens showing the Global‑e CrossBorder application icon.
For details, see:
* [Install the CrossBorder App](/installation-271802#install-the-crossborder-app)
* [Install the Global‑e Payments App](/installation-271802#install-the-global-e-payments-app)
## Install the CrossBorder App
The Global‑e CrossBorder app works in tandem with the Global‑e Payments; this app cannot be implemented or used independently.
The following sections describe the steps needed to perform the **initial** installation and configuration of the Global‑e CrossBorder Application.
**To install the Global-e CrossBorder application:**
1. Click the Global‑e CrossBorder installation link.
**STG (Staging)** - Sandbox Example:
[https://apps.shopify.com/global-e-crossborder-int](https://apps.shopify.com/global-e-crossborder-int)
**PROD (Production)** - (Example):
Run the installation on the subdomain Myshopify.com.
[https://apps.shopify.com/global-e-crossborder](https://apps.shopify.com/global-e-crossborder)
The installation screen opens showing the Global‑e CrossBorder application icon.
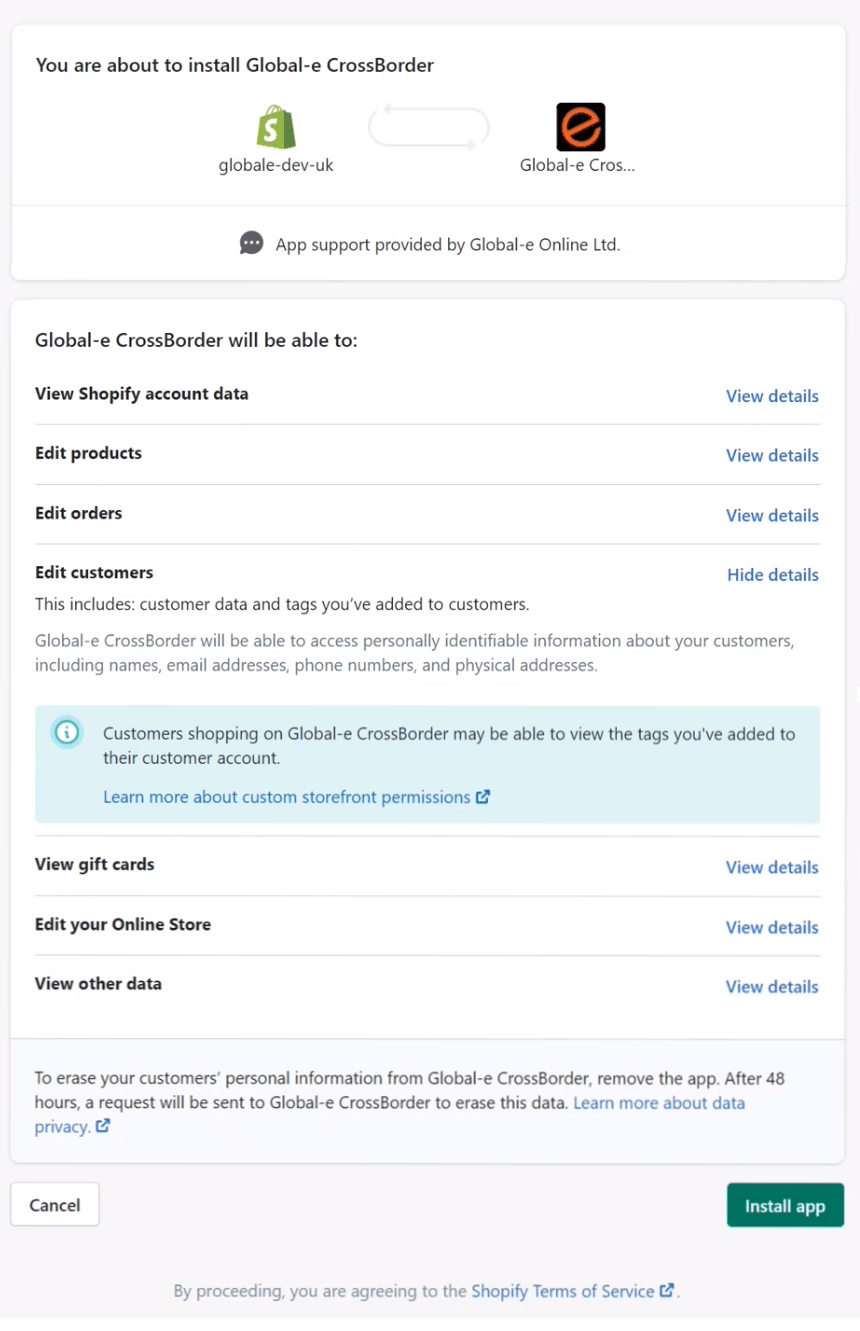 2.
3. Click **Install app**.
A screen opens showing Setup Instructions and Account Settings.
**AT THIS STAGE, DO NOT TOGGLE THE GLOBAL-E ENABLED BUTTON.**
2.
3. Click **Install app**.
A screen opens showing Setup Instructions and Account Settings.
**AT THIS STAGE, DO NOT TOGGLE THE GLOBAL-E ENABLED BUTTON.**
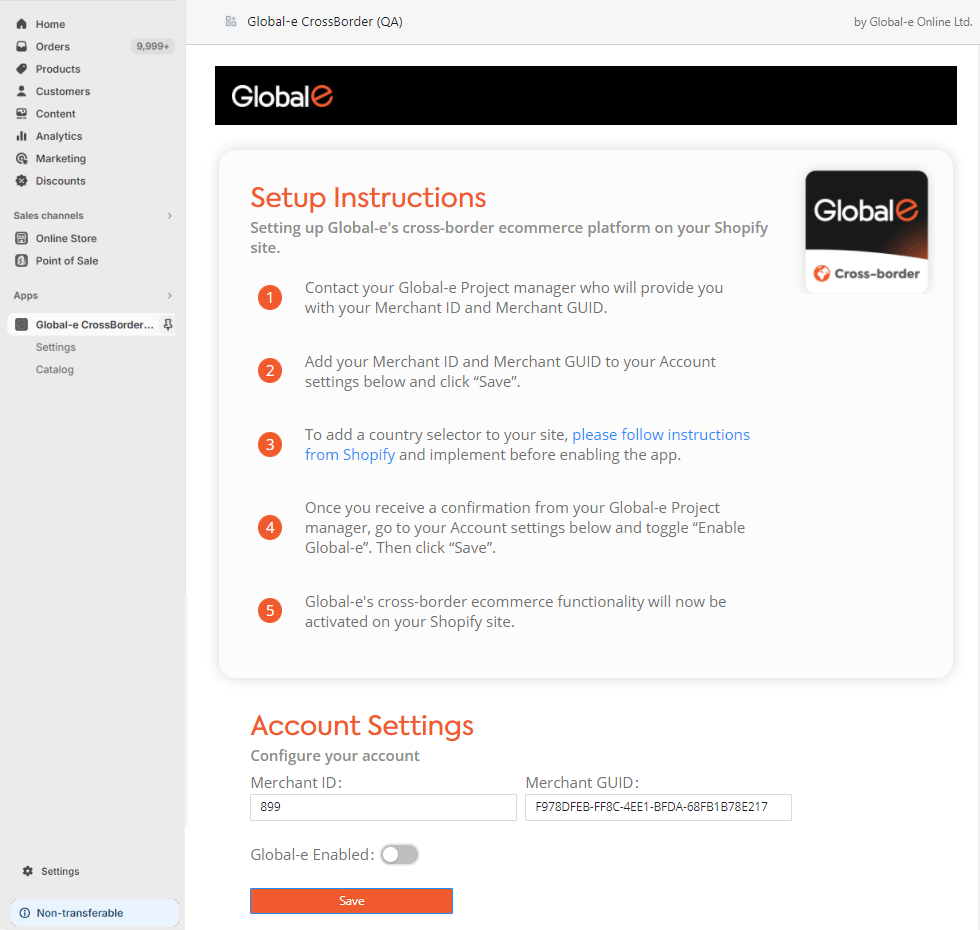 **To set up your account and enable the CrossBorder App:**
1. Make sure you have your Merchant ID and your Merchant GUID.
If you are unable to retrieve your merchant credentials, contact your Global‑e Customer Success Manager.
2. Under Account Settings, enter your account information as detailed below, then click **Save**.
| Account Information | Description |
| ------------------- | ------------------------------------------------------------------------------------------------------------------------------------------------------------------------------------------------------------------------------ |
| Merchant ID | Your Merchant Account ID, as recorded on the Global-e Merchant Portal. Example: 899 |
| Merchant GUID | The private key of your Merchant Account ID on the Global-e Merchant Portal.Example: F978DFEB-FF8C-4EE1-BFDA-68FB1B78E217**Note:** Currently, Global‑e does not support multiple stores under the same Global‑e Merchant GUID. |
After completing your account setup:
1. Notify your Global‑e Integration Manager that your account setup is complete.
Global‑e can now prepare your merchant environment, which includes uploading your catalogue, configuring shipping methods, and more.
2. Wait for Global-e to request that you toggle Global-e enabled. (This button is disabled by default and should only be enabled upon Global-e's confirmation).
3. Upon Global-e request, toggle **Global-e Enabled**, then click **Save**.
**To set up your account and enable the CrossBorder App:**
1. Make sure you have your Merchant ID and your Merchant GUID.
If you are unable to retrieve your merchant credentials, contact your Global‑e Customer Success Manager.
2. Under Account Settings, enter your account information as detailed below, then click **Save**.
| Account Information | Description |
| ------------------- | ------------------------------------------------------------------------------------------------------------------------------------------------------------------------------------------------------------------------------ |
| Merchant ID | Your Merchant Account ID, as recorded on the Global-e Merchant Portal. Example: 899 |
| Merchant GUID | The private key of your Merchant Account ID on the Global-e Merchant Portal.Example: F978DFEB-FF8C-4EE1-BFDA-68FB1B78E217**Note:** Currently, Global‑e does not support multiple stores under the same Global‑e Merchant GUID. |
After completing your account setup:
1. Notify your Global‑e Integration Manager that your account setup is complete.
Global‑e can now prepare your merchant environment, which includes uploading your catalogue, configuring shipping methods, and more.
2. Wait for Global-e to request that you toggle Global-e enabled. (This button is disabled by default and should only be enabled upon Global-e's confirmation).
3. Upon Global-e request, toggle **Global-e Enabled**, then click **Save**.
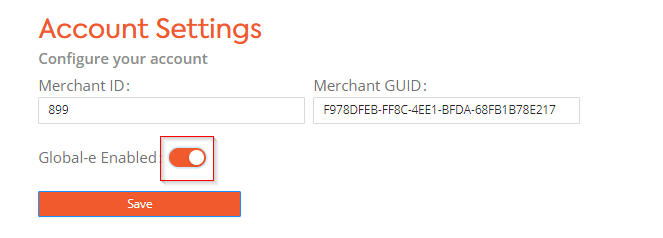 The CrossBorder app is now enabled.
Once enabled, Global‑e adds the shipping zones (for countries operated by Global‑e) and the carrier service to your store and adds the Global‑e JavaScript on each page of your site, including on the Checkout page. See [Global‑e JavaScript](/installation-271802#global-e-javascript-271802).
The Configuration screen shows that your Global‑e account configuration (Step 1) is complete. For more information on the Configuration screen, see section [Install the Global‑e Payments App](/installation-271802#install-the-global-e-payments-app).
The CrossBorder app **MUST** be enabled before you can enable the Payment app.
### Global‑e JavaScript
Global‑e adds the JavaScript files automatically to all the pages of your website by the means of the Shopify Script Tag API.
**Global‑e JavaScript main functionality:**
* Restricted products
* Handles the replacement flow
* Adds the marketing banner
* Supports the payment flow on the checkout page.
## Install the Global‑e Payments App
The Global‑e Payments App enables Global‑e to process international payments on your behalf.
The Global‑e Payments App works in tandem with the Global‑e CrossBorder app and cannot be implemented or used independently.
The following sections describe the steps required to perform the **initial** installation and configuration of the Global‑e Payments.
**To install Global-e Payments:**
1. Click the Global‑e Payments installation link.
**STG** (Staging) - sandbox:
[https://apps.shopify.com/global-e-onsite-payments-int](https://apps.shopify.com/global-e-onsite-payments-int)
**PROD** (Production - example:
Run the installation on the subdomain Myshopify.com.
[https://apps.shopify.com/global-e-onsite-payments](https://apps.shopify.com/global-e-onsite-payments)
The installation screen opens showing the Global‑e Payment icon.
The CrossBorder app is now enabled.
Once enabled, Global‑e adds the shipping zones (for countries operated by Global‑e) and the carrier service to your store and adds the Global‑e JavaScript on each page of your site, including on the Checkout page. See [Global‑e JavaScript](/installation-271802#global-e-javascript-271802).
The Configuration screen shows that your Global‑e account configuration (Step 1) is complete. For more information on the Configuration screen, see section [Install the Global‑e Payments App](/installation-271802#install-the-global-e-payments-app).
The CrossBorder app **MUST** be enabled before you can enable the Payment app.
### Global‑e JavaScript
Global‑e adds the JavaScript files automatically to all the pages of your website by the means of the Shopify Script Tag API.
**Global‑e JavaScript main functionality:**
* Restricted products
* Handles the replacement flow
* Adds the marketing banner
* Supports the payment flow on the checkout page.
## Install the Global‑e Payments App
The Global‑e Payments App enables Global‑e to process international payments on your behalf.
The Global‑e Payments App works in tandem with the Global‑e CrossBorder app and cannot be implemented or used independently.
The following sections describe the steps required to perform the **initial** installation and configuration of the Global‑e Payments.
**To install Global-e Payments:**
1. Click the Global‑e Payments installation link.
**STG** (Staging) - sandbox:
[https://apps.shopify.com/global-e-onsite-payments-int](https://apps.shopify.com/global-e-onsite-payments-int)
**PROD** (Production - example:
Run the installation on the subdomain Myshopify.com.
[https://apps.shopify.com/global-e-onsite-payments](https://apps.shopify.com/global-e-onsite-payments)
The installation screen opens showing the Global‑e Payment icon.
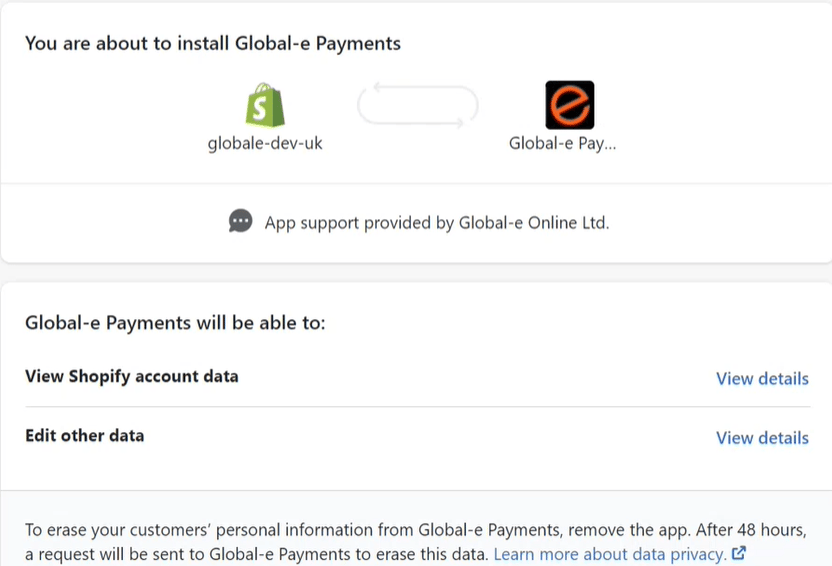 2. Click **Install app** (at the bottom of the installation screen).
The Global‑e Payments App installation is complete, and the Configuration page opens.
2. Click **Install app** (at the bottom of the installation screen).
The Global‑e Payments App installation is complete, and the Configuration page opens.
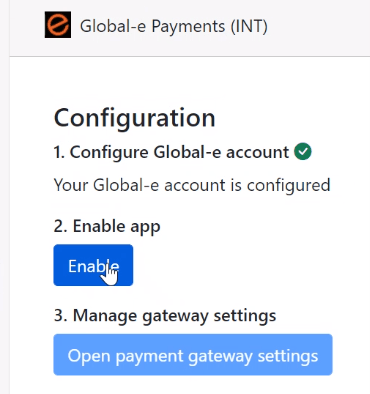 3. Click **Enable app** to enable the Global‑e Payments app.
Note that you can only perform this step if the CrossBorder app has been enabled (1), as detailed in the [CrossBorder App installation and configuration](/installation-271802#install-the-crossborder-app) section.
4. To Activate Global-e Payments, click **Open payment gateway settings.**
The Payment Methods screen opens, featuring a partial list of payments methods supported by Global-e.
In the Payment Methods screen:
* The checkboxes in front of the payment methods are not functional.
Selecting or clearing them has no impact on the payment methods displayed on the checkout page.
* This screen features only a partial list of Payment Methods supported by Global-e.
* Test mode is not available when using the Global‑e Payments app in the Production store. You can only test payments in the sandbox (staging environment).
3. Click **Enable app** to enable the Global‑e Payments app.
Note that you can only perform this step if the CrossBorder app has been enabled (1), as detailed in the [CrossBorder App installation and configuration](/installation-271802#install-the-crossborder-app) section.
4. To Activate Global-e Payments, click **Open payment gateway settings.**
The Payment Methods screen opens, featuring a partial list of payments methods supported by Global-e.
In the Payment Methods screen:
* The checkboxes in front of the payment methods are not functional.
Selecting or clearing them has no impact on the payment methods displayed on the checkout page.
* This screen features only a partial list of Payment Methods supported by Global-e.
* Test mode is not available when using the Global‑e Payments app in the Production store. You can only test payments in the sandbox (staging environment).
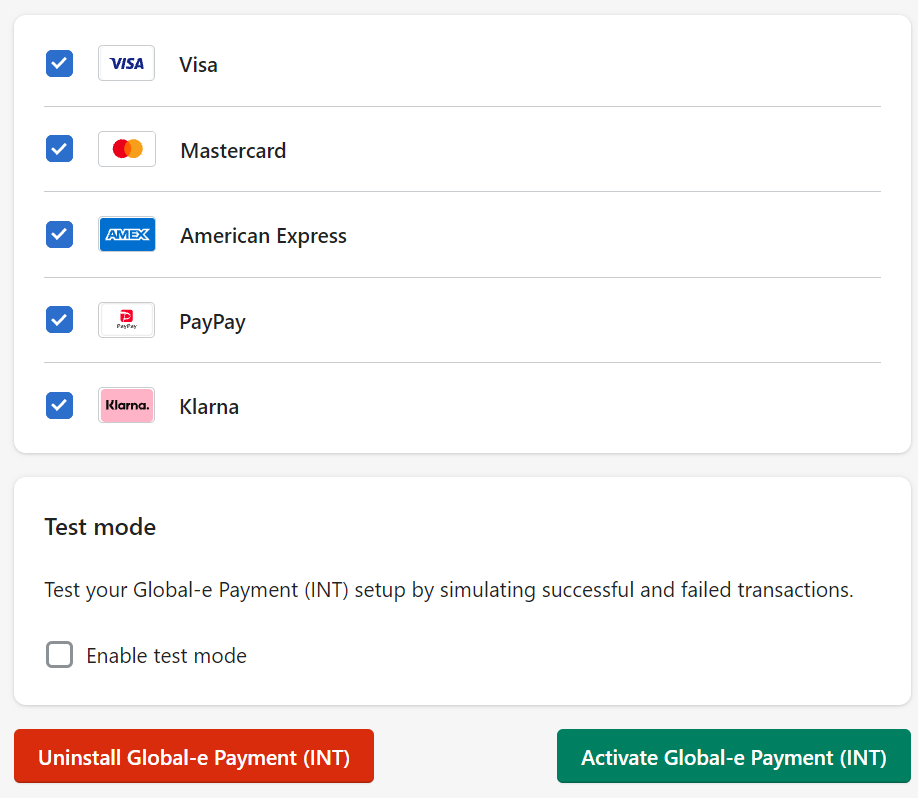 5. Click **Activate Global‑e Payment**.
Activating Global‑e Payments enables the Payment Methods supported by Global‑e in Shopify.
The Global‑e CrossBorder solution is now set. Global‑e can now manage your international orders and process payments on your behalf.
## Check the Installation
You can view the Global-e CrossBorder App installation listed with other apps previously installed.
**To view the installation:**
* In your Shopify admin, click on **> Apps**.
5. Click **Activate Global‑e Payment**.
Activating Global‑e Payments enables the Payment Methods supported by Global‑e in Shopify.
The Global‑e CrossBorder solution is now set. Global‑e can now manage your international orders and process payments on your behalf.
## Check the Installation
You can view the Global-e CrossBorder App installation listed with other apps previously installed.
**To view the installation:**
* In your Shopify admin, click on **> Apps**.
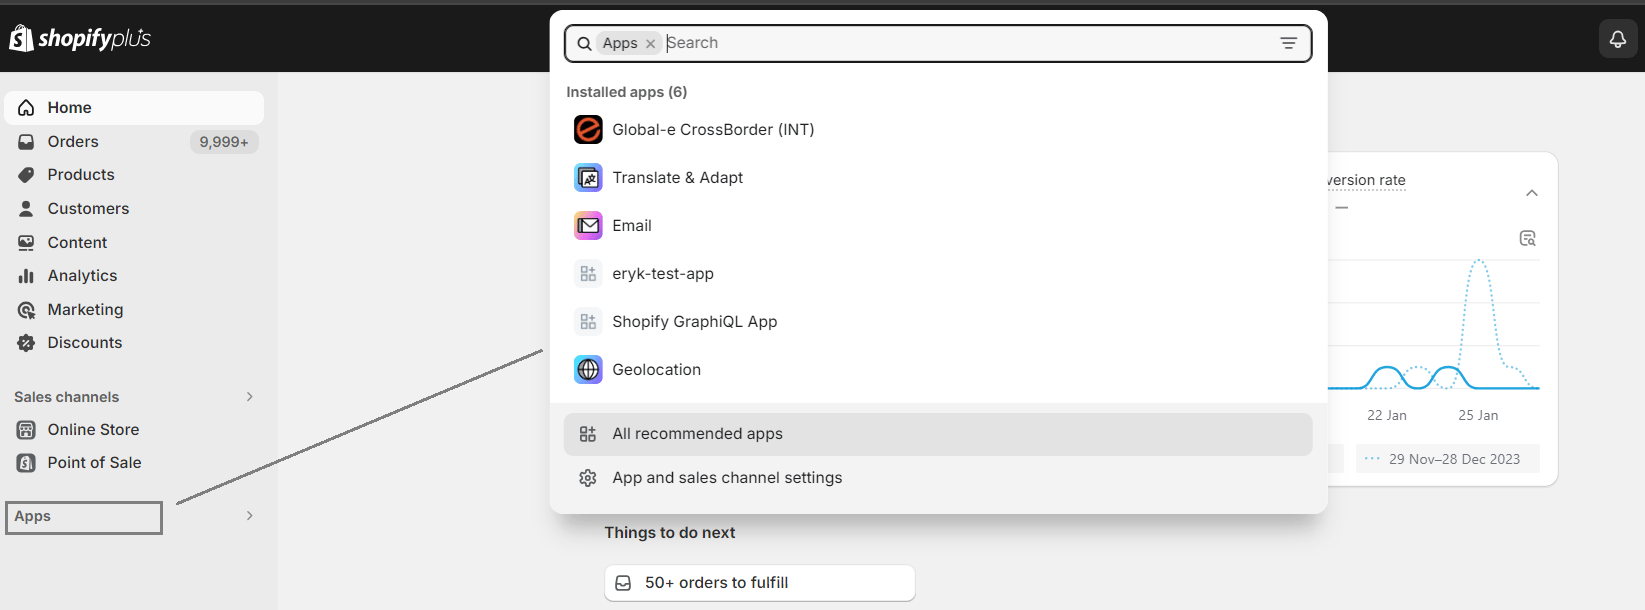 A window opens with a list of all the installed apps.
## Export your Catalogue
Global-e uses your catalogue to perform the product classification.
**To export your product catalogue
from your Shopify Production site:**
1. Log in to your Shopify Production site.
2. Go to **Products**.
A window opens with a list of all the installed apps.
## Export your Catalogue
Global-e uses your catalogue to perform the product classification.
**To export your product catalogue
from your Shopify Production site:**
1. Log in to your Shopify Production site.
2. Go to **Products**.
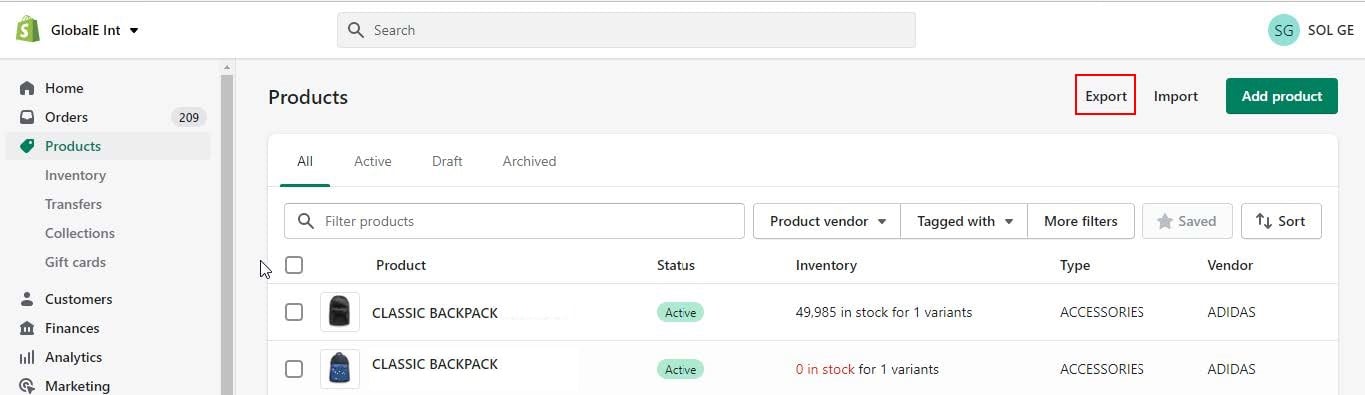 3. Click **Export**.
The Export products dialogue box opens.
3. Click **Export**.
The Export products dialogue box opens.
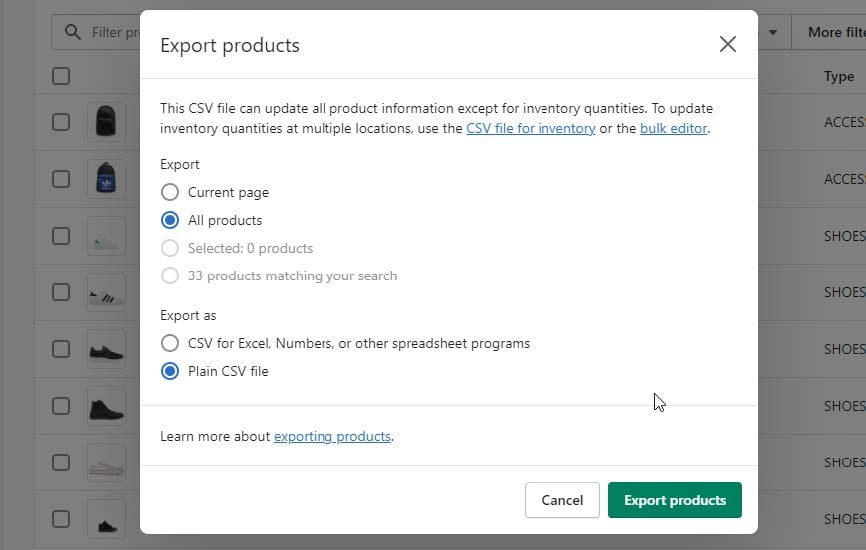 4. Select **All products** and **Plain CSV file**.
5. Click **Export Products**.
A CSV file containing your product catalogue is downloaded.
6. Zip the CSV file and email it to your Global-e Project Manager and to your Global-e Team.
## Migrating to Shopify Checkout Extensibility
Shopify’s new Checkout Extensibility makes it easier for Merchants to customize the Checkout using extensions and apps.
Merchants with a sandbox can choose to test out the Checkout Extensibility within the sandbox and then proceed with the migration in the live store. If you don't have a sandbox or prefer not to use it, you can migrate to the Checkout Extensibility directly in your live store.
### Merchants on Shopify Plus Plan
Follow the steps below to transition to Checkout Extensibility:
1. Provide Global-e with the URL, password, and permissions to your sandbox and live store. If you don't have, or prefer not to use, a sandbox, provide the details only for the live store.
Global-e updates your settings and installs the on-site payment application.
Note: If requested, you may need to provide Global-e with the permissions to install the application.
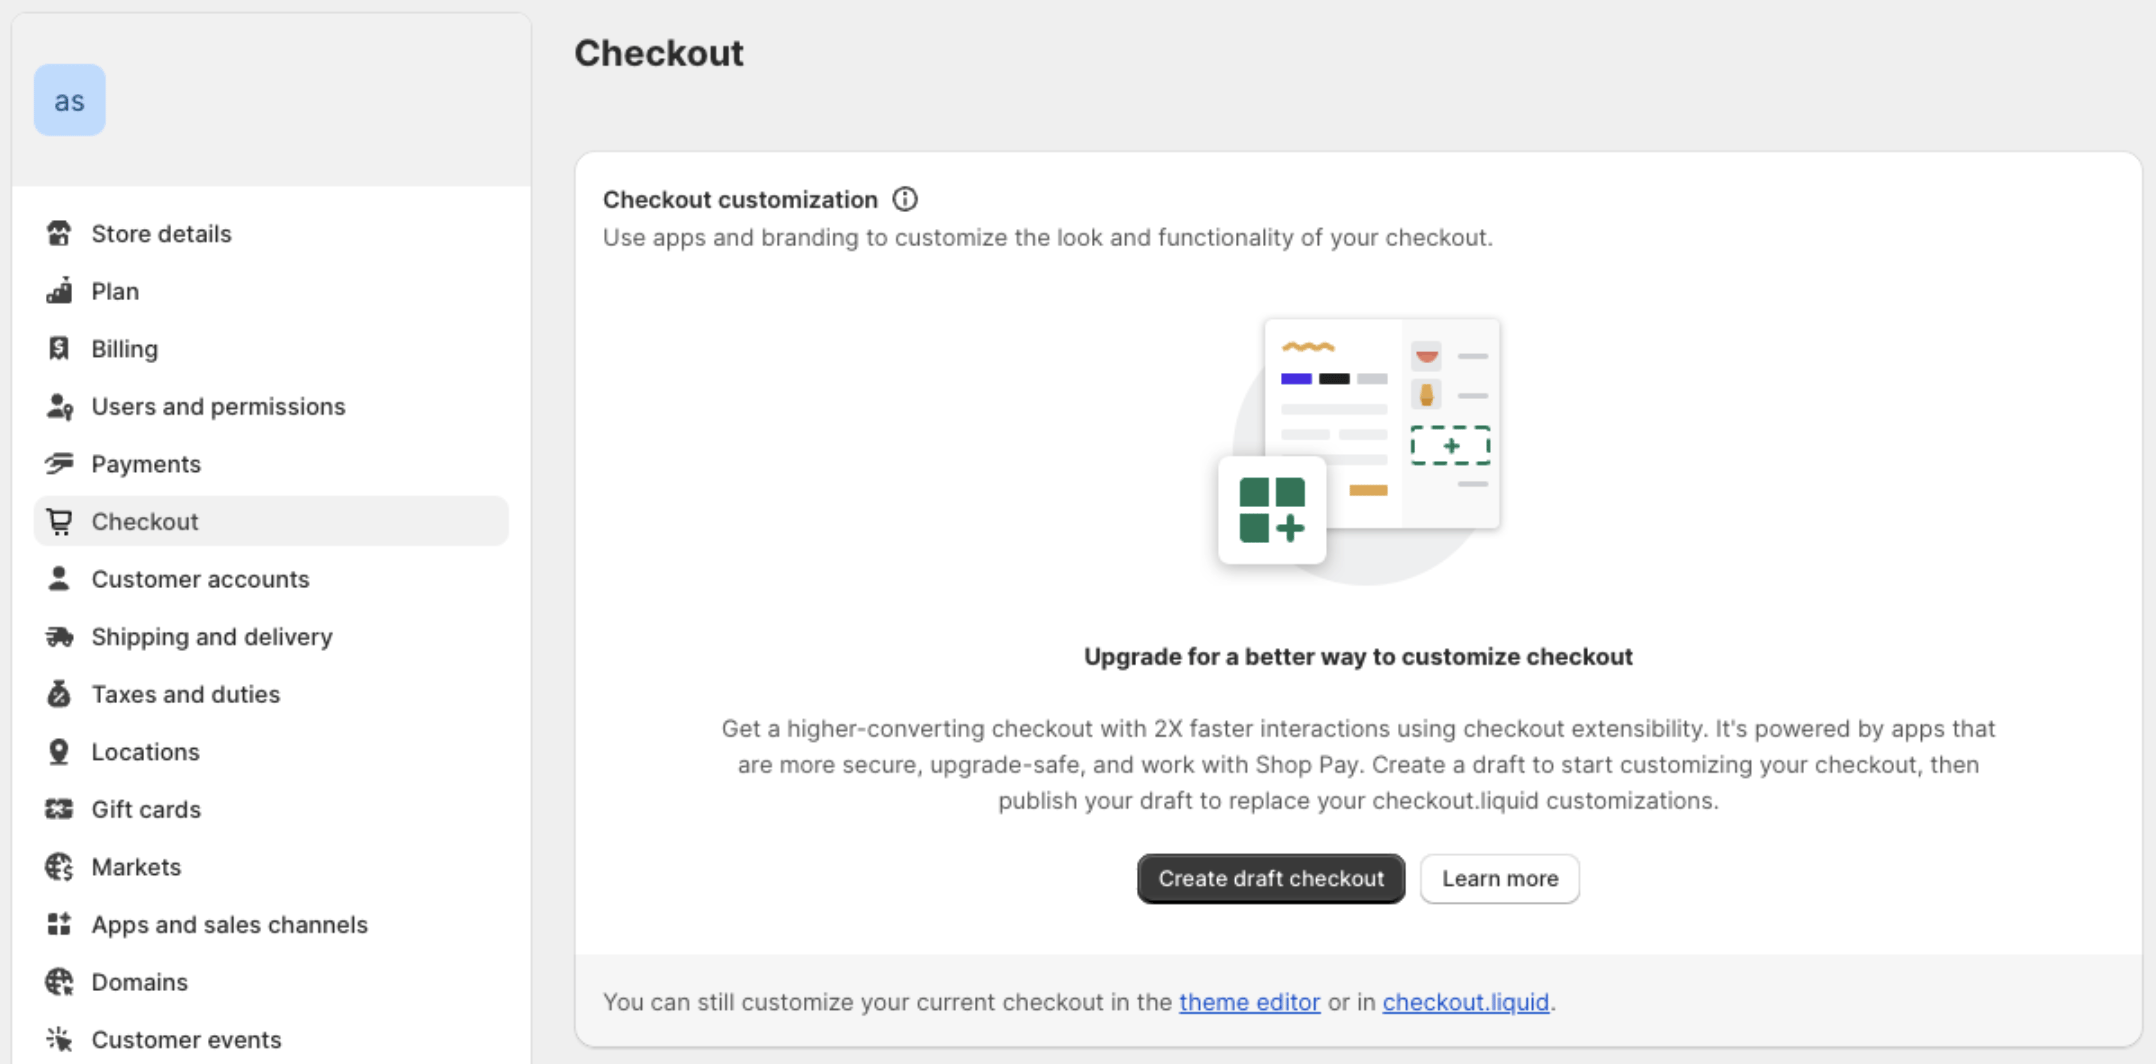
2. After 1-2 days, when the **Create Draft Checkout**option becomes available:
1. Go to Shopify > Settings > Checkout> Checkout customization.
2. Click **Create draft checkout.**
4. Select **All products** and **Plain CSV file**.
5. Click **Export Products**.
A CSV file containing your product catalogue is downloaded.
6. Zip the CSV file and email it to your Global-e Project Manager and to your Global-e Team.
## Migrating to Shopify Checkout Extensibility
Shopify’s new Checkout Extensibility makes it easier for Merchants to customize the Checkout using extensions and apps.
Merchants with a sandbox can choose to test out the Checkout Extensibility within the sandbox and then proceed with the migration in the live store. If you don't have a sandbox or prefer not to use it, you can migrate to the Checkout Extensibility directly in your live store.
### Merchants on Shopify Plus Plan
Follow the steps below to transition to Checkout Extensibility:
1. Provide Global-e with the URL, password, and permissions to your sandbox and live store. If you don't have, or prefer not to use, a sandbox, provide the details only for the live store.
Global-e updates your settings and installs the on-site payment application.
Note: If requested, you may need to provide Global-e with the permissions to install the application.
2. After 1-2 days, when the **Create Draft Checkout**option becomes available:
1. Go to Shopify > Settings > Checkout> Checkout customization.
2. Click **Create draft checkout.**
 3. Add your extensions to the checkout, as per the Shopify instructions: [Customizing and editing your checkout](https://help.shopify.com/en/manual/checkout-settings/checkout-extensibility)
4. Notify Global-e that the extensions have been added so that Global-e can complete the configurations.
5. Go to Settings > Checkout > Customize your checkout > Draft and click **Publish**.
3. Add your extensions to the checkout, as per the Shopify instructions: [Customizing and editing your checkout](https://help.shopify.com/en/manual/checkout-settings/checkout-extensibility)
4. Notify Global-e that the extensions have been added so that Global-e can complete the configurations.
5. Go to Settings > Checkout > Customize your checkout > Draft and click **Publish**.
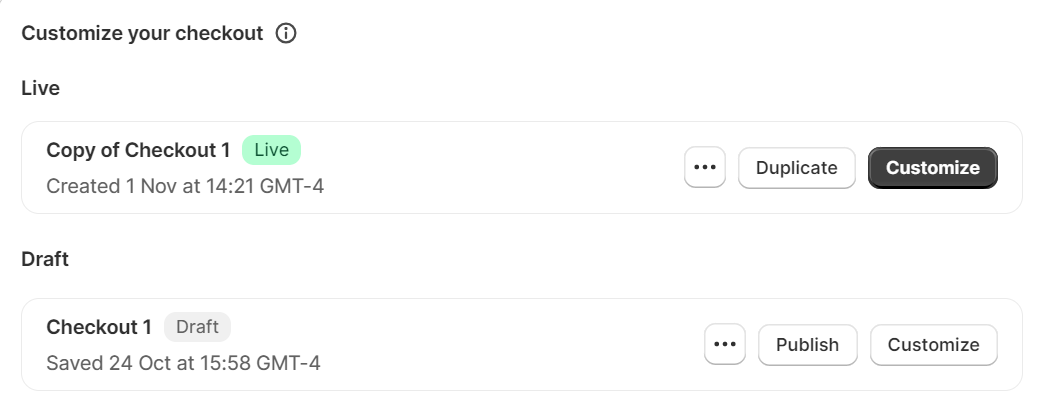 The Checkout Extensibility is now in place.
### Merchants on Shopify Non-Plus Plan
Follow this process to transition to Checkout Extensibility:
* Provide Global-e with the URL, password, and permissions to your sandbox and live store. If you don't have, or prefer not to use, a sandbox, provide the details only for the live store.
Global-e updates your settings and installs the on-site payment application.
Note: If requested, you may need to provide Global-e with the permissions to install the on-site payment application.
* After 1-2 days, you are automatically transitioned to Checkout Extensibility, and the Global-e extensions are added.
## Installation with Checkout Extensibility
The following Global-e applications are installed as part of the Shopify integration:
* CrossBorder app
* Offsite Payment app
* Onsite Payment app
**Note:** These applications are interdependent and cannot be implemented or used separately.
We highly recommend allowing Global- to perform the installations for you.
To have Global-e perform the installations, provide your project manager with the URL, password, and permissions to your sandbox and live store. If you don't have, or prefer not to use, a sandbox, provide the details just for the live store.
To perform the app installations yourself, follow the instructions for the relevant Shopify plan:
* [Shopify Plus plan](/installation-271802#shopify-plus-apps-installation)
* [Shopify Non-Plus plan](/installation-271802#shopify-non-plus-apps-installation)
### Shopify Plus Apps Installation
Installing the applications is a two-part process:
1. Install the three applications: CrossBorder App, Onsite Payment app, and Offsite Payment app.
2. Enable each of the applications.
It is very important to follow the precise order in which each app is installed and enabled. You also need to be in regular contact with your project manager during the process so Global-e can implement the required settings and configurations.
### Step 1. Install the CrossBorder Application
1. Click the relevant Global‑e CrossBorder installation link, replace **\[MerchantDomain]** with your Shopify domain, and run the installation.
**STG (Staging)** - Sandbox link:
[https://apps.shopify.com/global-e-crossborder-int](https://apps.shopify.com/global-e-crossborder-int)
**PROD (Production)** - Production link:
[https://apps.shopify.com/global-e-crossborder](https://apps.shopify.com/global-e-crossborder)
The installation screen opens showing the Global‑e CrossBorder application icon.
2. Click **Install app**.
A screen opens showing Setup Instructions and Account Settings.
**AT THIS STAGE, DO NOT TOGGLE THE GLOBAL-E ENABLED BUTTON.**
The Checkout Extensibility is now in place.
### Merchants on Shopify Non-Plus Plan
Follow this process to transition to Checkout Extensibility:
* Provide Global-e with the URL, password, and permissions to your sandbox and live store. If you don't have, or prefer not to use, a sandbox, provide the details only for the live store.
Global-e updates your settings and installs the on-site payment application.
Note: If requested, you may need to provide Global-e with the permissions to install the on-site payment application.
* After 1-2 days, you are automatically transitioned to Checkout Extensibility, and the Global-e extensions are added.
## Installation with Checkout Extensibility
The following Global-e applications are installed as part of the Shopify integration:
* CrossBorder app
* Offsite Payment app
* Onsite Payment app
**Note:** These applications are interdependent and cannot be implemented or used separately.
We highly recommend allowing Global- to perform the installations for you.
To have Global-e perform the installations, provide your project manager with the URL, password, and permissions to your sandbox and live store. If you don't have, or prefer not to use, a sandbox, provide the details just for the live store.
To perform the app installations yourself, follow the instructions for the relevant Shopify plan:
* [Shopify Plus plan](/installation-271802#shopify-plus-apps-installation)
* [Shopify Non-Plus plan](/installation-271802#shopify-non-plus-apps-installation)
### Shopify Plus Apps Installation
Installing the applications is a two-part process:
1. Install the three applications: CrossBorder App, Onsite Payment app, and Offsite Payment app.
2. Enable each of the applications.
It is very important to follow the precise order in which each app is installed and enabled. You also need to be in regular contact with your project manager during the process so Global-e can implement the required settings and configurations.
### Step 1. Install the CrossBorder Application
1. Click the relevant Global‑e CrossBorder installation link, replace **\[MerchantDomain]** with your Shopify domain, and run the installation.
**STG (Staging)** - Sandbox link:
[https://apps.shopify.com/global-e-crossborder-int](https://apps.shopify.com/global-e-crossborder-int)
**PROD (Production)** - Production link:
[https://apps.shopify.com/global-e-crossborder](https://apps.shopify.com/global-e-crossborder)
The installation screen opens showing the Global‑e CrossBorder application icon.
2. Click **Install app**.
A screen opens showing Setup Instructions and Account Settings.
**AT THIS STAGE, DO NOT TOGGLE THE GLOBAL-E ENABLED BUTTON.**
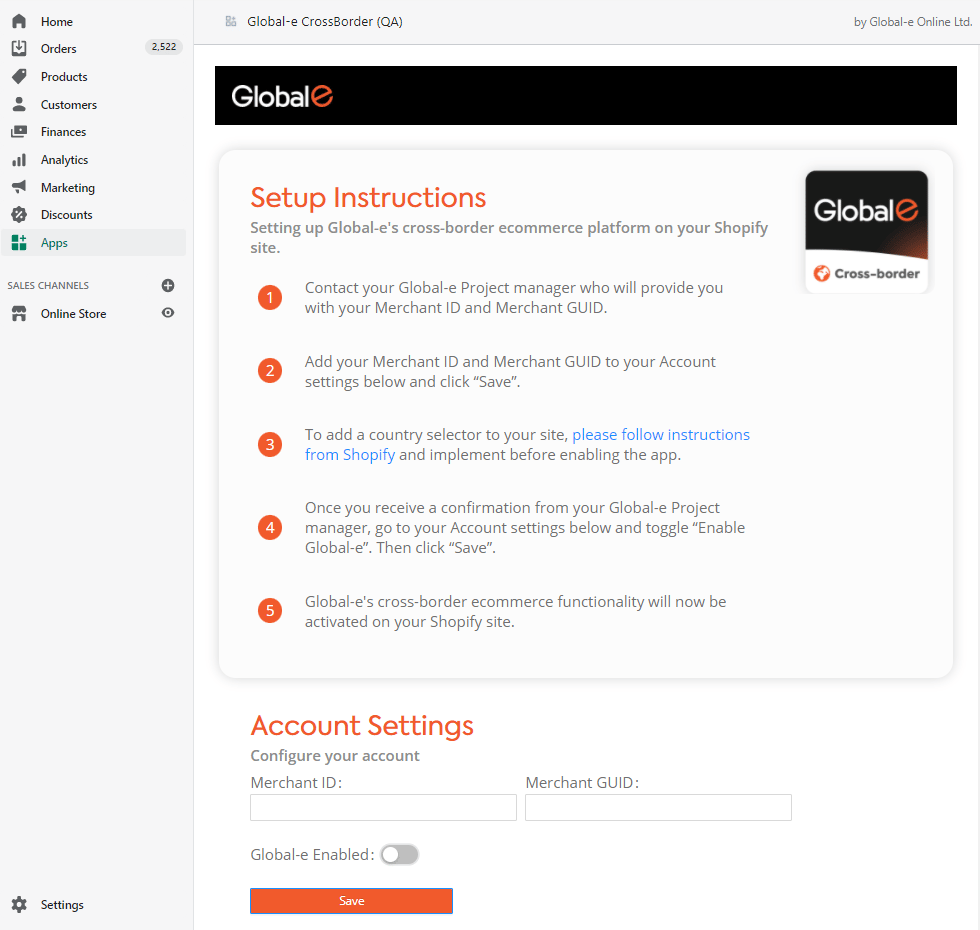 3. Exit the page.
### Step 2. Install the Global-e Onsite Payment app
1. Click the relevant Global‑e Payments installation link, replace **\[shopify domain]** with your Shopify domain, and run the installation.
**STG** (Staging) - Sandbox link:
[https://apps.shopify.com/global-e-onsite-payments-int](https://apps.shopify.com/global-e-onsite-payments-int)
**PROD** (Production) - Production link:
[https://apps.shopify.com/global-e-onsite-payments](https://apps.shopify.com/global-e-onsite-payments)
The Global-e Onsite Payments (INT) screen opens.
3. Exit the page.
### Step 2. Install the Global-e Onsite Payment app
1. Click the relevant Global‑e Payments installation link, replace **\[shopify domain]** with your Shopify domain, and run the installation.
**STG** (Staging) - Sandbox link:
[https://apps.shopify.com/global-e-onsite-payments-int](https://apps.shopify.com/global-e-onsite-payments-int)
**PROD** (Production) - Production link:
[https://apps.shopify.com/global-e-onsite-payments](https://apps.shopify.com/global-e-onsite-payments)
The Global-e Onsite Payments (INT) screen opens.
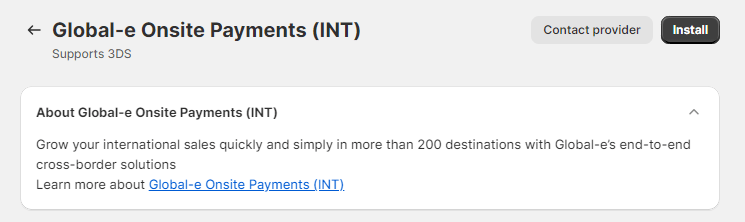 2. At the top of the screen, click **Install.**
The installation screen opens showing the Global‑e Onsite Payment icon.
2. At the top of the screen, click **Install.**
The installation screen opens showing the Global‑e Onsite Payment icon.
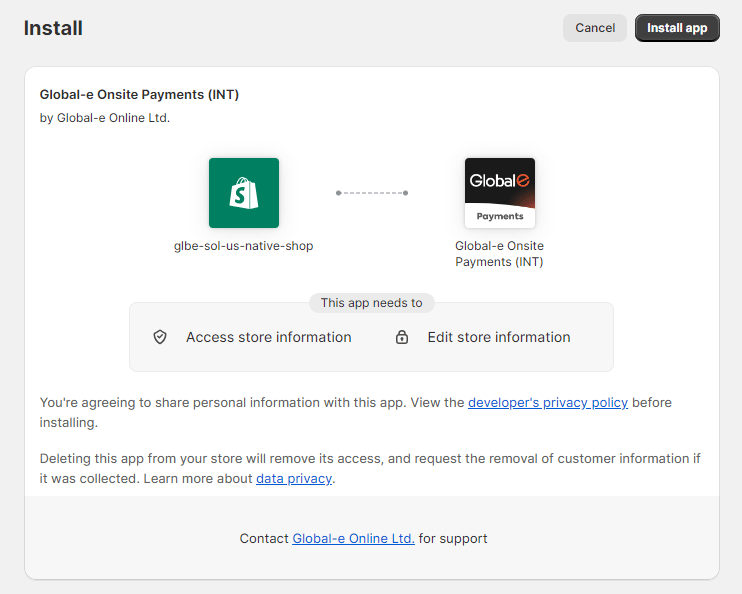 3. At the top of the screen, click **Install app.**
The Global‑e Payments App installation is complete, and the Configuration page opens.
3. At the top of the screen, click **Install app.**
The Global‑e Payments App installation is complete, and the Configuration page opens.
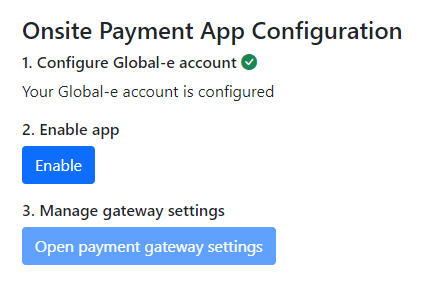 4. Exit the configuration page.
### Step 3. Install the Global-e Offsite Payment app
1. Click the relevant Global‑e Payments installation link, replace **\[MerchantDomain]** with your Shopify domain, and run the installation.
**STG** (Staging) - Sandbox link:
[https://apps.shopify.com/global-e-payment-int](https://apps.shopify.com/global-e-payment-int)
**PROD** (Production) - Production link:
[https://apps.shopify.com/global-e-payments](https://apps.shopify.com/global-e-payments)
The installation screen opens showing the Global‑e Payment icon.
2. At the bottom of the screen click **Install app.**
The Global‑e Payments App installation is complete, and the Configuration page opens.
3. Exit the configuration page.
### Step 4. Notify your Project Manager that you have installed the applications.
After Global-e incorporates the additional settings, you receive a notification to proceed to step 5.
### Step 5. Enable the CrossBorder app
1. Make sure you have your Merchant ID and Merchant GUID.
If you are unable to retrieve your Merchant credentials, contact your Global‑e Project Manager.
2. Under Account Settings, enter your account information as detailed below and click **Save**.
| Account Information | Description |
| ------------------- | ------------------------------------------------------------------------------------------------------------------------------------------------------------------------------------------------------------------------------------------------------------- |
| Merchant ID | Your Merchant Account ID, as recorded on the Global-e Merchant Portal. Example: 899 |
| Merchant GUID | The private key of your Merchant Account ID on the Global-e Merchant Portal.The private key of your Merchant Account ID on the Global-e Merchant Portal.**Note:** Currently, Global‑e does not support multiple stores under the same Global‑e Merchant GUID. |
3. Notify your Project Manager that you have set up your account.
Global-e prepares your Merchant environment, which includes uploading your catalogue and configuring shipping methods.
Once these configurations are completed, your project manager notifies you that the app can be enabled
4. Toggle **Global-e Enabled** and click Save.
The Configuration screen confirms that your Global‑e account configuration is complete.
The CrossBorder app is now enabled and Global-e implements the following settings:
* Global-e extensions are automatically added to your Checkout.
* Global‑e adds the shipping zones (for countries operated by Global‑e) and the carrier service to your store
* Global‑e JavaScript is added on each page of your site, including on the Checkout page. See [Global‑e JavaScript](/installation-271802#global-e-javascript-271802-1).
The CrossBorder app **MUST** be enabled before you can enable the Payment app.
5. Wait for your Project Manager to confirm that the configurations are complete before continuing with Step 6.
This process takes about 1-2 days business days, during which time Global-e performs several validations.
### Global‑e JavaScript
Global‑e adds the JavaScript files automatically to all the pages of your website by means of the Shopify Script Tag API.
**Global‑e JavaScript main functionality:**
* Restricted products
* Handles the replacement flow
* Adds the marketing banner
* Supports the payment flow on the checkout page.
### Step 6. Enable Global-e Onsite Payment app
1. Click on the relevant link to return to the Onsite Payment app page.
* Testing sandbox (QA-INT) environment:
[https://apps.shopify.com/global-e-onsite-payments-int](https://apps.shopify.com/global-e-onsite-payments-int)
* Production environment:
[https://apps.shopify.com/global-e-onsite-payments](https://apps.shopify.com/global-e-onsite-payments)
Make sure to replace the **MyShopifyPrefix** with your Shopify domain.
4. Exit the configuration page.
### Step 3. Install the Global-e Offsite Payment app
1. Click the relevant Global‑e Payments installation link, replace **\[MerchantDomain]** with your Shopify domain, and run the installation.
**STG** (Staging) - Sandbox link:
[https://apps.shopify.com/global-e-payment-int](https://apps.shopify.com/global-e-payment-int)
**PROD** (Production) - Production link:
[https://apps.shopify.com/global-e-payments](https://apps.shopify.com/global-e-payments)
The installation screen opens showing the Global‑e Payment icon.
2. At the bottom of the screen click **Install app.**
The Global‑e Payments App installation is complete, and the Configuration page opens.
3. Exit the configuration page.
### Step 4. Notify your Project Manager that you have installed the applications.
After Global-e incorporates the additional settings, you receive a notification to proceed to step 5.
### Step 5. Enable the CrossBorder app
1. Make sure you have your Merchant ID and Merchant GUID.
If you are unable to retrieve your Merchant credentials, contact your Global‑e Project Manager.
2. Under Account Settings, enter your account information as detailed below and click **Save**.
| Account Information | Description |
| ------------------- | ------------------------------------------------------------------------------------------------------------------------------------------------------------------------------------------------------------------------------------------------------------- |
| Merchant ID | Your Merchant Account ID, as recorded on the Global-e Merchant Portal. Example: 899 |
| Merchant GUID | The private key of your Merchant Account ID on the Global-e Merchant Portal.The private key of your Merchant Account ID on the Global-e Merchant Portal.**Note:** Currently, Global‑e does not support multiple stores under the same Global‑e Merchant GUID. |
3. Notify your Project Manager that you have set up your account.
Global-e prepares your Merchant environment, which includes uploading your catalogue and configuring shipping methods.
Once these configurations are completed, your project manager notifies you that the app can be enabled
4. Toggle **Global-e Enabled** and click Save.
The Configuration screen confirms that your Global‑e account configuration is complete.
The CrossBorder app is now enabled and Global-e implements the following settings:
* Global-e extensions are automatically added to your Checkout.
* Global‑e adds the shipping zones (for countries operated by Global‑e) and the carrier service to your store
* Global‑e JavaScript is added on each page of your site, including on the Checkout page. See [Global‑e JavaScript](/installation-271802#global-e-javascript-271802-1).
The CrossBorder app **MUST** be enabled before you can enable the Payment app.
5. Wait for your Project Manager to confirm that the configurations are complete before continuing with Step 6.
This process takes about 1-2 days business days, during which time Global-e performs several validations.
### Global‑e JavaScript
Global‑e adds the JavaScript files automatically to all the pages of your website by means of the Shopify Script Tag API.
**Global‑e JavaScript main functionality:**
* Restricted products
* Handles the replacement flow
* Adds the marketing banner
* Supports the payment flow on the checkout page.
### Step 6. Enable Global-e Onsite Payment app
1. Click on the relevant link to return to the Onsite Payment app page.
* Testing sandbox (QA-INT) environment:
[https://apps.shopify.com/global-e-onsite-payments-int](https://apps.shopify.com/global-e-onsite-payments-int)
* Production environment:
[https://apps.shopify.com/global-e-onsite-payments](https://apps.shopify.com/global-e-onsite-payments)
Make sure to replace the **MyShopifyPrefix** with your Shopify domain.
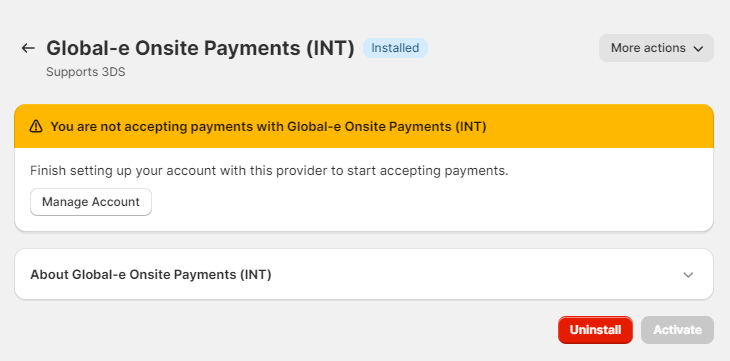 2. Click **Manage Account**.
The Onsite Payment App Configuration page opens.
3. Click **Enable**.
A message displays confirming that the app is enabled.
2. Click **Manage Account**.
The Onsite Payment App Configuration page opens.
3. Click **Enable**.
A message displays confirming that the app is enabled.
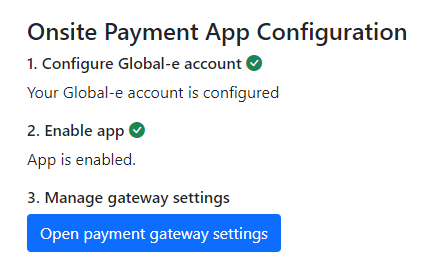 4. Click **Open payment gateway settings** to return to the Onsite Payments page.
The Payment Methods screen opens, featuring a partial list of payment methods supported by Global-e.
4. Click **Open payment gateway settings** to return to the Onsite Payments page.
The Payment Methods screen opens, featuring a partial list of payment methods supported by Global-e.
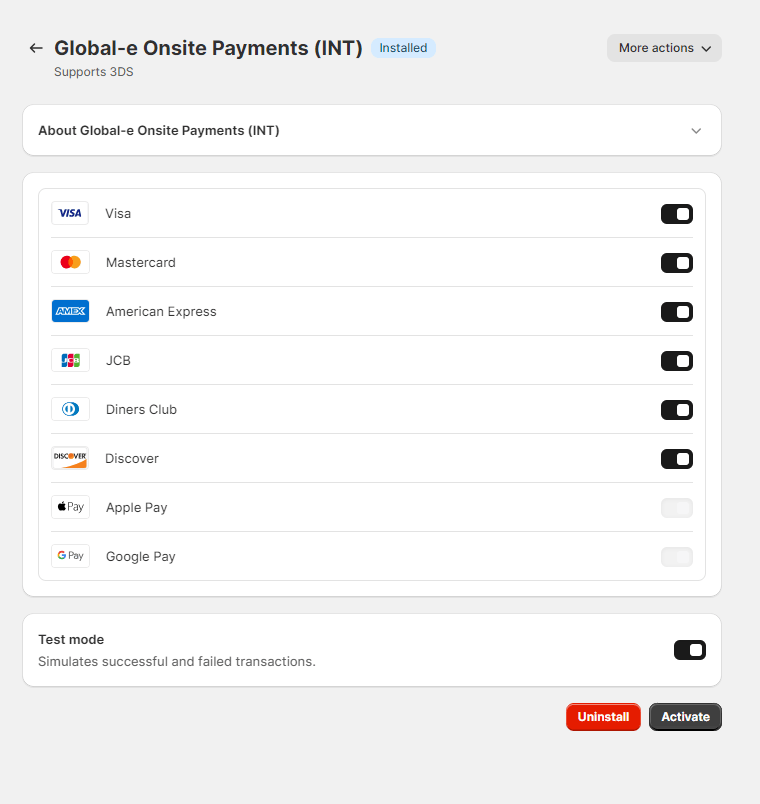 * The checkboxes in front of the payment methods are not functional. Selecting or clearing them has no impact on the payment methods displayed on the checkout page.
* the Payment Methods screen features only a partial list of Payment Methods supported by Global-e.
5. Enable test mode, if you are in the sandbox.
Note: Test mode is not available when using the app in production.
6. On the bottom right, click **Activate**.
### Step 7. Enable Global-e Offsite Payment app
1. Click on the relevant link to return to the Offsite Payment app page.
* Testing sandbox (QA-INT) environment:
[https://apps.shopify.com/global-e-payment-int](https://apps.shopify.com/global-e-payment-int)
* Production environment:
[https://apps.shopify.com/global-e-payments](https://apps.shopify.com/global-e-payments)
Make sure to replace \[MerchantDomain] with your Shopify domain.
2. Click **Enable** to enable the Offsite Payment app.
* The checkboxes in front of the payment methods are not functional. Selecting or clearing them has no impact on the payment methods displayed on the checkout page.
* the Payment Methods screen features only a partial list of Payment Methods supported by Global-e.
5. Enable test mode, if you are in the sandbox.
Note: Test mode is not available when using the app in production.
6. On the bottom right, click **Activate**.
### Step 7. Enable Global-e Offsite Payment app
1. Click on the relevant link to return to the Offsite Payment app page.
* Testing sandbox (QA-INT) environment:
[https://apps.shopify.com/global-e-payment-int](https://apps.shopify.com/global-e-payment-int)
* Production environment:
[https://apps.shopify.com/global-e-payments](https://apps.shopify.com/global-e-payments)
Make sure to replace \[MerchantDomain] with your Shopify domain.
2. Click **Enable** to enable the Offsite Payment app.
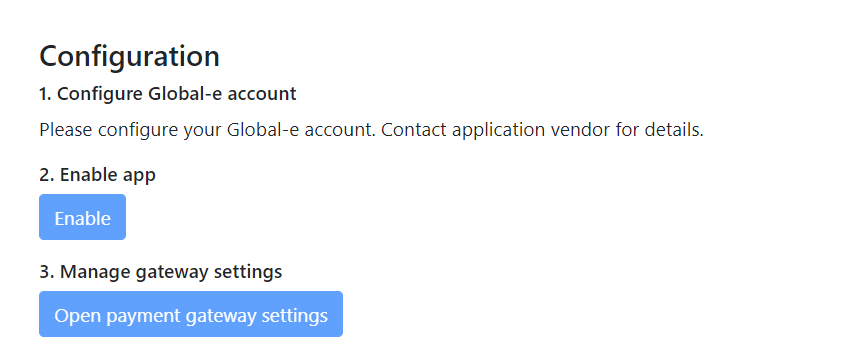 3. Click **Open payment gateway settings** to activate the Offsite Payment app.
The Payment Methods screen opens, featuring a partial list of payment methods supported by Global-e.
* The checkboxes in front of the payment methods are not functional.
Selecting or clearing them has no impact on the payment methods displayed on the checkout page.
* The Payment Methods screen features only a partial list of Payment Methods supported by Global-e.
4. Select **Enable test mode**, if you are in the sandbox.
Note: Test mode is not available when using the app in production.
5. Click **Activate Global-e Payment**
The Payment Methods supported by Global‑e in Shopify are enabled.
6. Notify your Project Manager that the apps are enabled.
### Shopify Non-Plus Apps Installation
Installing the applications is a two-part process.
1. Install the three applications: CrossBorder App, Onsite Payment app, and Offsite Payment app.
2. Enable each of the applications.
It is very important to follow the precise order in which each app is installed and enabled. You also need to be in regular contact with your project manager during the process so Global-e can implement the required settings and configurations.
### Step 1. Install the Global-e Onsite Payment app
1. Click the relevant Global‑e Payments installation link, replace **\[shopify domain]** with your Shopify domain, and run the installation.
**STG** (Staging) - Sandbox link:
[https://apps.shopify.com/global-e-onsite-payments-int](https://apps.shopify.com/global-e-onsite-payments-int)
**PROD** (Production) - Production link:
[https://apps.shopify.com/global-e-onsite-payments](https://apps.shopify.com/global-e-onsite-payments)
The Global-e Onsite Payments (INT) screen opens.
2. At the top of the screen, click **Install.**
The installation screen opens showing the Global‑e Onsite Payment icon.
3. At the top of the screen, click **Install app.**
The Global‑e Payments App installation is complete, and the Configuration page opens.
4. Exit the configuration page.
### Step 2. Notify your Project Manager that you have installed the Onsite Payment App
At this point, Global-e implements additional configurations, a process that takes 1-2 days.
After the settings are in place, your Project Manager informs you that you can continue to Step 3.
Wait for confirmation from your project manager before advancing to Step 3.
### Step 3. Install the CrossBorder App
1. Click the relevant Global‑e CrossBorder installation link, replace \[MerchantDomain] with your Shopify domain, and run the installation.
**STG (Staging)** - Sandbox link:
[https://crossborder-integration-qa-int.bglobale.com/Integration/App/InstallOrUpgrade?shop=\[MerchantDomain\].myshopify.com](https://apps.shopify.com/global-e-crossborder-int)
**PROD (Production)** - Production link:
[https://crossborder-integration.global-e.com/Integration/App/InstallOrUpgrade?shop=\[MerchantDomain\].myshopify.com](https://crossborder-integration.global-e.com/Integration/App/InstallOrUpgrade?shop=%5bMerchantDomain%5d.myshopify.com)
The installation screen opens showing the Global‑e CrossBorder application icon.
2. Click **Install app**.
A screen opens showing setup instructions and account settings.
**AT THIS STAGE, DO NOT TOGGLE THE GLOBAL-E ENABLED BUTTON.**
3. Click **Open payment gateway settings** to activate the Offsite Payment app.
The Payment Methods screen opens, featuring a partial list of payment methods supported by Global-e.
* The checkboxes in front of the payment methods are not functional.
Selecting or clearing them has no impact on the payment methods displayed on the checkout page.
* The Payment Methods screen features only a partial list of Payment Methods supported by Global-e.
4. Select **Enable test mode**, if you are in the sandbox.
Note: Test mode is not available when using the app in production.
5. Click **Activate Global-e Payment**
The Payment Methods supported by Global‑e in Shopify are enabled.
6. Notify your Project Manager that the apps are enabled.
### Shopify Non-Plus Apps Installation
Installing the applications is a two-part process.
1. Install the three applications: CrossBorder App, Onsite Payment app, and Offsite Payment app.
2. Enable each of the applications.
It is very important to follow the precise order in which each app is installed and enabled. You also need to be in regular contact with your project manager during the process so Global-e can implement the required settings and configurations.
### Step 1. Install the Global-e Onsite Payment app
1. Click the relevant Global‑e Payments installation link, replace **\[shopify domain]** with your Shopify domain, and run the installation.
**STG** (Staging) - Sandbox link:
[https://apps.shopify.com/global-e-onsite-payments-int](https://apps.shopify.com/global-e-onsite-payments-int)
**PROD** (Production) - Production link:
[https://apps.shopify.com/global-e-onsite-payments](https://apps.shopify.com/global-e-onsite-payments)
The Global-e Onsite Payments (INT) screen opens.
2. At the top of the screen, click **Install.**
The installation screen opens showing the Global‑e Onsite Payment icon.
3. At the top of the screen, click **Install app.**
The Global‑e Payments App installation is complete, and the Configuration page opens.
4. Exit the configuration page.
### Step 2. Notify your Project Manager that you have installed the Onsite Payment App
At this point, Global-e implements additional configurations, a process that takes 1-2 days.
After the settings are in place, your Project Manager informs you that you can continue to Step 3.
Wait for confirmation from your project manager before advancing to Step 3.
### Step 3. Install the CrossBorder App
1. Click the relevant Global‑e CrossBorder installation link, replace \[MerchantDomain] with your Shopify domain, and run the installation.
**STG (Staging)** - Sandbox link:
[https://crossborder-integration-qa-int.bglobale.com/Integration/App/InstallOrUpgrade?shop=\[MerchantDomain\].myshopify.com](https://apps.shopify.com/global-e-crossborder-int)
**PROD (Production)** - Production link:
[https://crossborder-integration.global-e.com/Integration/App/InstallOrUpgrade?shop=\[MerchantDomain\].myshopify.com](https://crossborder-integration.global-e.com/Integration/App/InstallOrUpgrade?shop=%5bMerchantDomain%5d.myshopify.com)
The installation screen opens showing the Global‑e CrossBorder application icon.
2. Click **Install app**.
A screen opens showing setup instructions and account settings.
**AT THIS STAGE, DO NOT TOGGLE THE GLOBAL-E ENABLED BUTTON.**
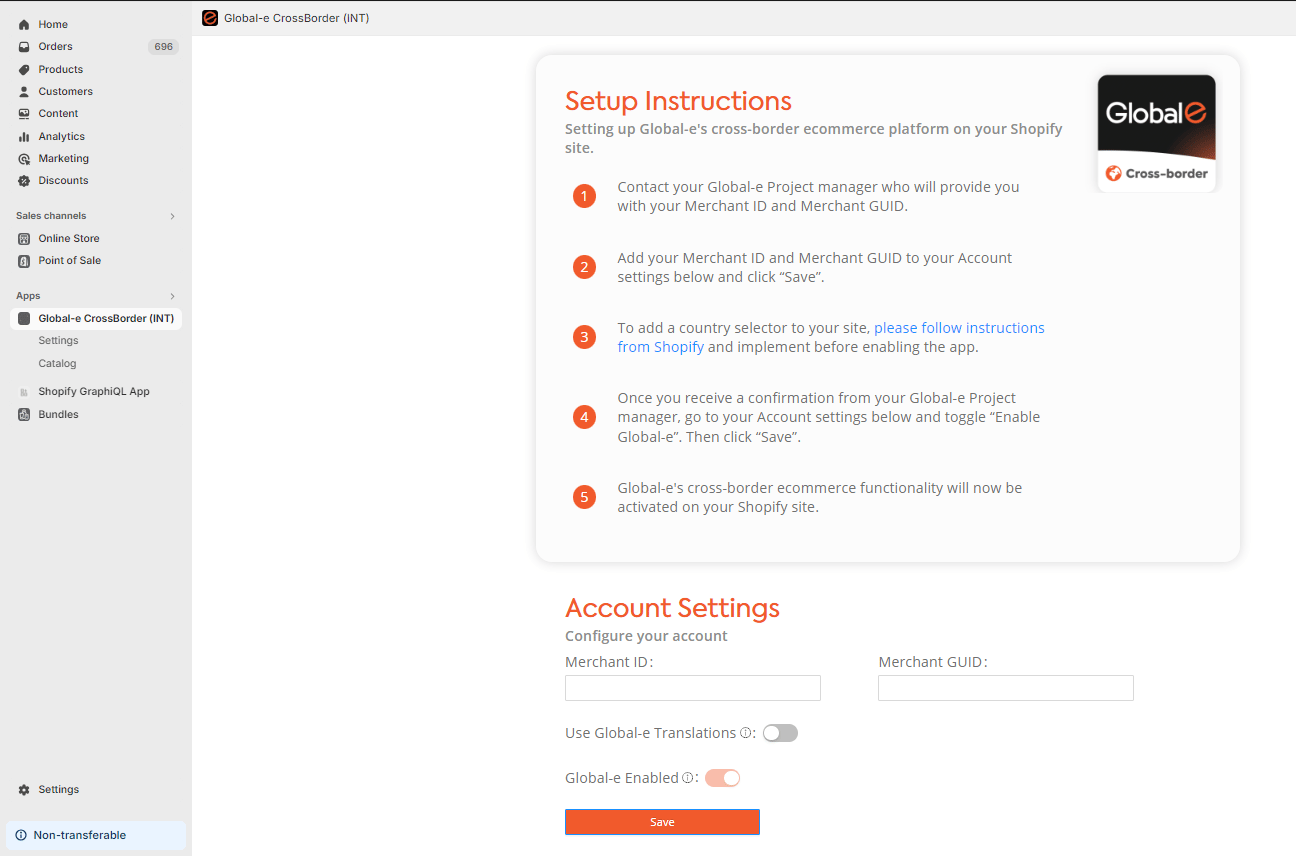 3. Exit the page.
### Step 4. Install the Global-e Offsite Payment app
1. Click the relevant Global‑e Payments installation link, replace **\[MerchantDomain]** with your Shopify domain, and run the installation.
**STG** (Staging) - Sandbox link:
[https://apps.shopify.com/global-e-payment-int](https://apps.shopify.com/global-e-payment-int)
**PROD** (Production) - Production link:
[https://apps.shopify.com/global-e-payments](https://apps.shopify.com/global-e-payments)
The installation screen opens showing the Global‑e Payment icon.
2. At the bottom of the screen click **Install app.**
The Global‑e Payments App installation is complete, and the configuration page opens.
3. Exit the configuration page.
### Step 4. Enable the CrossBorder app
1. Make sure you have your Merchant ID and Merchant GUID.
If you are unable to retrieve your Merchant credentials, contact your Global‑e Project Manager.
2. Under Account Settings, enter your account information as detailed below and click **Save**.
| Account Information | Description |
| ------------------- | ------------------------------------------------------------------------------------------------------------------------------------------------------------------------------------------------------------------------------------------------------------- |
| Merchant ID | Your Merchant Account ID, as recorded on the Global-e Merchant Portal. Example: 899 |
| Merchant GUID | The private key of your Merchant Account ID on the Global-e Merchant Portal.The private key of your Merchant Account ID on the Global-e Merchant Portal.**Note:** Currently, Global‑e does not support multiple stores under the same Global‑e Merchant GUID. |
3. Notify your Project Manager that you have set up your account.
Global-e prepares your Merchant environment, which includes uploading your catalogue and configuring shipping methods. Once these configurations are completed, your project manager notifies you that the app can be enabled
4. Toggle **Global-e Enabled** and click Save.
The configuration screen confirms that your Global‑e account configuration is complete.
The CrossBorder app is now enabled and Global-e implements the following settings:
* Global-e extensions are automatically added to your Checkout.
* Global‑e adds the shipping zones (for countries operated by Global‑e) and the carrier service to your store
* Global‑e JavaScript is added on each page of your site, including on the Checkout page. See [Global‑e JavaScript](/installation-271802#global-e-javascript-271802-2).
The CrossBorder app **MUST** be enabled before you can enable the Payment app.
5. Wait for your Project Manager to confirm that the configurations are complete before continuing with Step 5.
This process takes about 1-2 days, during which time Global-e performs some validations.
### Global‑e JavaScript
Global‑e adds the JavaScript files automatically to all the pages of your website by means of the Shopify Script Tag API.
**Global‑e JavaScript main functionality:**
* Restricted products
* Handles the replacement flow
* Adds the marketing banner
* Supports the payment flow on the checkout page.
### Step 5. Enable Global-e Onsite Payment app
1. Click on the relevant link to open the Onsite Payment app page.
* Testing sandbox (QA-INT) environment:
[https://apps.shopify.com/global-e-onsite-payments-int](https://apps.shopify.com/global-e-onsite-payments-int)
* Production environment:
[https://apps.shopify.com/global-e-onsite-payments](http://https://apps.shopify.com/global-e-onsite-payments)
Make sure to replace the **MyShopifyPrefix** with your Shopify domain.
2. Click **Manage Account**.
The Onsite Payment App Configuration page opens.
3. Click **Enable**.
A message displays confirming that the app is enabled.
4. Click **Open payment gateway settings** to return to the Onsite Payments page.
The Payment Methods screen opens, featuring a partial list of payment methods supported by Global-e.
* The checkboxes in front of the payment methods are not functional. Selecting or clearing them has no impact on the payment methods displayed on the checkout page.
* The Payment Methods screen features only a partial list of Payment Methods supported by Global-e.
5. Enable test mode, if you are in the sandbox.
6. Note: Test mode is not available when using the app in production.
7. On the bottom right, click **Activate**.
### Step 6. Enable Global-e Offsite Payment app
1. Click on the relevant link to open the Offsite Payment app page.
* Testing sandbox (QA-INT) environment:
[https://apps.shopify.com/global-e-payment-int](https://apps.shopify.com/global-e-payment-int)
* Production environment:
[https://apps.shopify.com/global-e-payments](https://apps.shopify.com/global-e-payments)
Make sure to replace **\[MerchantDomain]** with your Shopify domain.
2. Click **Enable** to enable the Offsite Payment app.
3. Click **Open payment gateway settings** to activate the Offsite Payment app.
The Payment Methods screen opens, featuring a partial list of payment methods supported by Global-e.
In the Payment Methods screen:
* The checkboxes in front of the payment methods are not functional.
Selecting or clearing them has no impact on the payment methods displayed on the checkout page.
* This screen features only a partial list of Payment Methods supported by Global-e.
* Test mode is not available when using the Global‑e Payments app in the Production store. You can only test payments in the sandbox (staging environment).
4. Click **Activate Global-e Payment**
Activating **Global‑e Payments** enables the Payment Methods supported by Global‑e in Shopify.
5. Notify your Project Manager that the apps are enabled.
## Shopify Store Settings
**To configure your Shopify store:**
1. Set the Customer contact method to Email (only).
From your Shopify admin, go to Settings > Checkout and Accounts.
3. Exit the page.
### Step 4. Install the Global-e Offsite Payment app
1. Click the relevant Global‑e Payments installation link, replace **\[MerchantDomain]** with your Shopify domain, and run the installation.
**STG** (Staging) - Sandbox link:
[https://apps.shopify.com/global-e-payment-int](https://apps.shopify.com/global-e-payment-int)
**PROD** (Production) - Production link:
[https://apps.shopify.com/global-e-payments](https://apps.shopify.com/global-e-payments)
The installation screen opens showing the Global‑e Payment icon.
2. At the bottom of the screen click **Install app.**
The Global‑e Payments App installation is complete, and the configuration page opens.
3. Exit the configuration page.
### Step 4. Enable the CrossBorder app
1. Make sure you have your Merchant ID and Merchant GUID.
If you are unable to retrieve your Merchant credentials, contact your Global‑e Project Manager.
2. Under Account Settings, enter your account information as detailed below and click **Save**.
| Account Information | Description |
| ------------------- | ------------------------------------------------------------------------------------------------------------------------------------------------------------------------------------------------------------------------------------------------------------- |
| Merchant ID | Your Merchant Account ID, as recorded on the Global-e Merchant Portal. Example: 899 |
| Merchant GUID | The private key of your Merchant Account ID on the Global-e Merchant Portal.The private key of your Merchant Account ID on the Global-e Merchant Portal.**Note:** Currently, Global‑e does not support multiple stores under the same Global‑e Merchant GUID. |
3. Notify your Project Manager that you have set up your account.
Global-e prepares your Merchant environment, which includes uploading your catalogue and configuring shipping methods. Once these configurations are completed, your project manager notifies you that the app can be enabled
4. Toggle **Global-e Enabled** and click Save.
The configuration screen confirms that your Global‑e account configuration is complete.
The CrossBorder app is now enabled and Global-e implements the following settings:
* Global-e extensions are automatically added to your Checkout.
* Global‑e adds the shipping zones (for countries operated by Global‑e) and the carrier service to your store
* Global‑e JavaScript is added on each page of your site, including on the Checkout page. See [Global‑e JavaScript](/installation-271802#global-e-javascript-271802-2).
The CrossBorder app **MUST** be enabled before you can enable the Payment app.
5. Wait for your Project Manager to confirm that the configurations are complete before continuing with Step 5.
This process takes about 1-2 days, during which time Global-e performs some validations.
### Global‑e JavaScript
Global‑e adds the JavaScript files automatically to all the pages of your website by means of the Shopify Script Tag API.
**Global‑e JavaScript main functionality:**
* Restricted products
* Handles the replacement flow
* Adds the marketing banner
* Supports the payment flow on the checkout page.
### Step 5. Enable Global-e Onsite Payment app
1. Click on the relevant link to open the Onsite Payment app page.
* Testing sandbox (QA-INT) environment:
[https://apps.shopify.com/global-e-onsite-payments-int](https://apps.shopify.com/global-e-onsite-payments-int)
* Production environment:
[https://apps.shopify.com/global-e-onsite-payments](http://https://apps.shopify.com/global-e-onsite-payments)
Make sure to replace the **MyShopifyPrefix** with your Shopify domain.
2. Click **Manage Account**.
The Onsite Payment App Configuration page opens.
3. Click **Enable**.
A message displays confirming that the app is enabled.
4. Click **Open payment gateway settings** to return to the Onsite Payments page.
The Payment Methods screen opens, featuring a partial list of payment methods supported by Global-e.
* The checkboxes in front of the payment methods are not functional. Selecting or clearing them has no impact on the payment methods displayed on the checkout page.
* The Payment Methods screen features only a partial list of Payment Methods supported by Global-e.
5. Enable test mode, if you are in the sandbox.
6. Note: Test mode is not available when using the app in production.
7. On the bottom right, click **Activate**.
### Step 6. Enable Global-e Offsite Payment app
1. Click on the relevant link to open the Offsite Payment app page.
* Testing sandbox (QA-INT) environment:
[https://apps.shopify.com/global-e-payment-int](https://apps.shopify.com/global-e-payment-int)
* Production environment:
[https://apps.shopify.com/global-e-payments](https://apps.shopify.com/global-e-payments)
Make sure to replace **\[MerchantDomain]** with your Shopify domain.
2. Click **Enable** to enable the Offsite Payment app.
3. Click **Open payment gateway settings** to activate the Offsite Payment app.
The Payment Methods screen opens, featuring a partial list of payment methods supported by Global-e.
In the Payment Methods screen:
* The checkboxes in front of the payment methods are not functional.
Selecting or clearing them has no impact on the payment methods displayed on the checkout page.
* This screen features only a partial list of Payment Methods supported by Global-e.
* Test mode is not available when using the Global‑e Payments app in the Production store. You can only test payments in the sandbox (staging environment).
4. Click **Activate Global-e Payment**
Activating **Global‑e Payments** enables the Payment Methods supported by Global‑e in Shopify.
5. Notify your Project Manager that the apps are enabled.
## Shopify Store Settings
**To configure your Shopify store:**
1. Set the Customer contact method to Email (only).
From your Shopify admin, go to Settings > Checkout and Accounts.
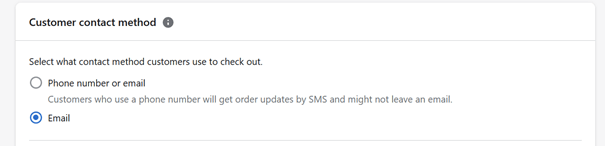 2. The phone number field must appear on the checkout page. Please set **Shipping address phone** number to **Required**.
To complete the checkout, the Global-e CrossBorder solution requires that customers enter their phone number as part of the shipping address on the Shopify checkout page.
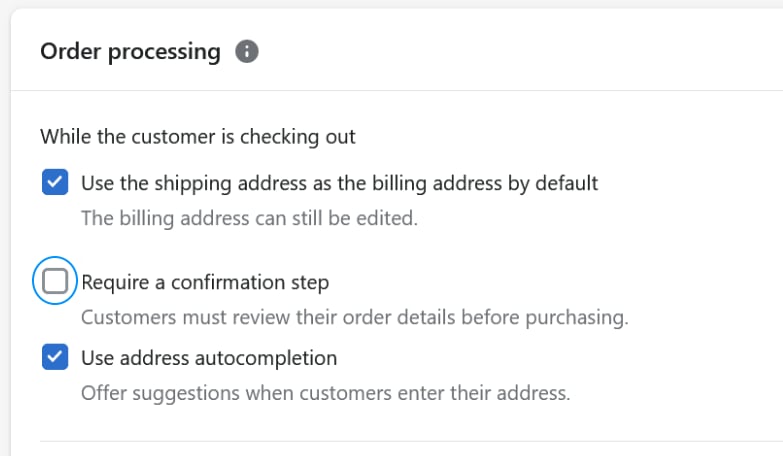
3. Optionally, you can enable/disable the setting to review your order.
1. From your Shopify Admin, go to Settings > General > Order processing.
2. The **Require a confirmation step** is supported by Global-e. If you do not see the option, you can skip it.
2. The phone number field must appear on the checkout page. Please set **Shipping address phone** number to **Required**.
To complete the checkout, the Global-e CrossBorder solution requires that customers enter their phone number as part of the shipping address on the Shopify checkout page.
3. Optionally, you can enable/disable the setting to review your order.
1. From your Shopify Admin, go to Settings > General > Order processing.
2. The **Require a confirmation step** is supported by Global-e. If you do not see the option, you can skip it.
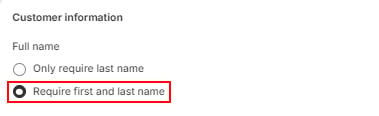
 4. Set customer information:
* From your Shopify Admin, go to Settings > Checkout > Customer Information > Full Name.
* Adjust the setting to **Require first and last name.**
4. Set customer information:
* From your Shopify Admin, go to Settings > Checkout > Customer Information > Full Name.
* Adjust the setting to **Require first and last name.**